Smarthome/IoT Motes
June 2015
Overview
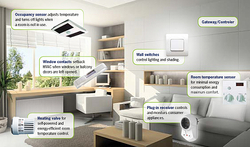
Smarthome product have made their appearance in the mass market around the late 2000s, and more and more consumers begin to adopt them. The idea that everyday household tasks could be abstracted by intelligent devices, and that one could get feedback on their use and energy consumption, has enthralled many homeowners.
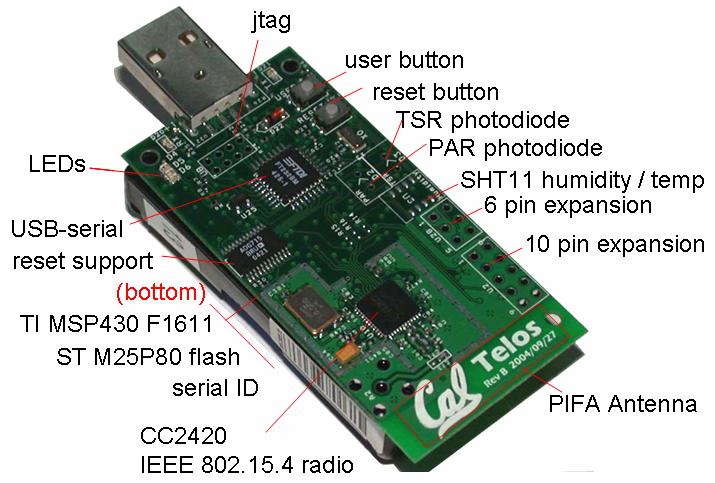
To gain experience in this area, my classmate Akshat Thirani and I worked together to code small, battery-powered embedded devices called TelosB motes to measure light, humidity, and temperature.
We placed these motes in different parts of the house to simulate different conditions (e.g. a mote in the fridge to detect temperature, opening/closing the window shades to simulate day and night). We also demonstrated that these motes could communicate to each other through a sensor network and trigger events based on their sensor readings, to blink lights based on sensor data.
Status - NOT MAINTAINED. Please don’t message me about this project.
(The code is on a private repo because it contains our solutions for class assignments.)

General Approach and Results
The TelosB motes run on an “operating system” for low-powered, embedded devices called TinyOS. It has drivers and libraries for microcontrollers, sensors, timers, radio communication, and other integrated chips for different embedded devices.
It is written in nesC, a dialect of C, and firmware comprises a .nc main file, .h headers, and a Makefile.
Our project was to design and program a TinyOS application to run on two TelosB motes, utilizing the built-in light, temperature, and humidity sensors to provide real-time notifications, and “display” the notification on the on-board available LEDs. In addition, one mote would transmit temperature data from its sensor to the other, and the second mote would transfer light data to the first, triggering the blinking of different LEDs. While we used 2 motes, our code could be expanded to include more motes for more sensors or event triggers.
Method
nesC reminded me of Arduino code, with separate “configuration” and “implementation” functions, similar to the “setup” and “loop” functions of the Arduino programming language. After calling header files (e.g. the Timer library), the program first sets thing up in the “configuration” function by calling components with a “provides” function (general things like LEDs, timer) and “uses” functions (like radio functions). These components are then called in the actual functions in the “implementation” function, which we looped while adding a delay timer so the motes would sample from the sensors every x seconds.
We wrote code for two separate sensor modules, splitting up temperature, light, and humidity across them. Then we added events for when the radio listening for the other motes’ sensor data received a payload packet, and wrote conditional functions to blink LEDs. We defined packets as new data types containing the sensor information. Given the straightforward nature of our example, we didn’t use ACK bits or checksums, but they would be straightforward to implement with the radio component function. Since we had only 2 motes, we also didn’t using any routing algorithms or addressing, but these could be implemented in future projects.
Installation
http://tinyos.stanford.edu/tinyos-wiki/index.php/Automatic_installation
Note: TinyOS only offered support up to 12.04 (natty) and only supported 32-bit libraries. I had trouble installing several key libraries on Ubuntu 14.04.
Getting Started and Compiling
http://tinyos.stanford.edu/tinyos-wiki/index.php/The_simplest_TinyOS_program
Debugging
To test code, the TelosB motes had several LEDs to blink. You can also debug by printing to Serial for a USB-connected mote.
What I Learned
Through this project, we learned how to send data to another TelosB mote with its native sensors, and display this both printed to the command line as well as blinking on-board LEDs on and off. We could send temperature, humidity, and light sensor data to another mote, and have the receiving node trigger an event (to blink an LED) based on threshold values of the first mote’s sensor data.
In the future, more complex applications could be triggered by sensor data, such as shutting the blinds when it’s too bright, or turning up the temperature if it’s too cold, or asking for sensor data from a different mote only when certain thresholds are triggered. We could apply what we learned from this project to future projects, for example prototyping a system of smarthome sensors that detect light and temperature in each room of a house. We could, for example, combine these sensors with Internet-connected prototyping boards to create an app-enabled light switch, or automated blinds opener and temperature settings. With a sensor network, more complex technical challenges in addressing, routing, and other networking domains would be expected.
Sources
(1) TinyOS Wiki: http://tinyos.stanford.edu/tinyos-wiki/index.php/Main_Page
(2) Tutorials: http://www.tinyos.net/tinyos-1.x/doc/tutorial/
(3) 130+ pg book on TinyOS and programming: http://www.tinyos.net/tinyos-2.x/doc/pdf/tinyos-programming.pdf
(4) Washington - St. Louis tutorial: http://www.wsnmagazine.com/TinyOS%20tutorial.pdf